Zapier is a service that can help you automate tasks between a pair of online services (services like Salesforce, Basecamp, Gmail, and 190 more).
In essence, Zapier lets you integrate 2 systems through their API without having to write a single line of code.
This is a step-by-step guide on how to use eFront services via Zapier. Starting, you need to create a Zapier account – it is free to do so.
Currently, eFront-Zapier service offers the following triggers and actions (more on Zapier actions and triggers here):
Triggers
- New User: it is triggered each time a new user is created in your eFront system.
- New Course: it is triggered each time a new course is created in your eFront system
- New Category: it is triggered each time a new category is created in your eFront system
- New Branch: it is triggered each time a new branch is created in your eFront system
- New Group: it is triggered each time a new group is created in your eFront system
- New Certificate: it is triggered each time a new certificate is awarded to a user in a specific course
Actions
-
Create User: This action allows you to signup users to your eFront system.
It receives the following action fields: Login, Name, Surname, Email, Password. These fields are required for the new user to be created
-
Create Course: This action allows you to create new courses to your eFront system.
It receives the following action fields: Name, Category, Description, Course Type, Course Code. The fields Name and Category are required. The rest of the fields are optional.
-
Create Branch: This action allows you to create new branches to your eFront system.
It receives the following action fields: Name, URL (the URL of the branch you are going to create), Parent (the parent branch of the branch you are going to create), Public ID. The fields Name and URL are required. The rest of the fields are optional.
-
Add User to Course: This action allows you to assign users to courses in your eFront system.
It receives the following action fields: Course ID (the id of the course the user is going to be assigned to), User ID (the id of the user you are going to assign to the course). Both fields are required.
-
Add User to Group: This action allows you to assign users to groups in your eFront system.
It receives the following action fields: Group ID (the id of the group the user is going to be assigned to), User ID (the id of the user you are going to assign to the group). Both fields are required.
-
Add User to Branch: This action allows you to assign users to branches in your eFront system.
It receives the following action fields: Branch ID (the id of the branch the user is going to be assigned to), User ID (the id of the user you are going to assign to the branch). Both fields are required.
-
Update User's Status in a Course: This action allows you to update the status of users to courses in your eFront system.
It receives the following action fields: Course ID (the id of the course the user status is going to be updated), User ID (the id of the user you are going to update), Score, Status, Timestamp. The fields Course ID and User ID are required
Connecting your Account
When using Zapier with eFront, you will be asked to connect your eFront system with Zapier. To do so, you should visit the Zapier Connected Account page (take a note, that this step can be performed also, while you are building one of your Zaps).
Let us see how you would connect your eFront account. You shall need your eFront domain and your eFront API key.
-
eFront domain is the URL of your eFront installation
-
eFront API key, you can find this when you login in your eFront installation as administrator and navigate to 'System Settings' -> 'Integrations' -> 'API' (1). Over there click to enable API (2), click save and then copy your API key (3).
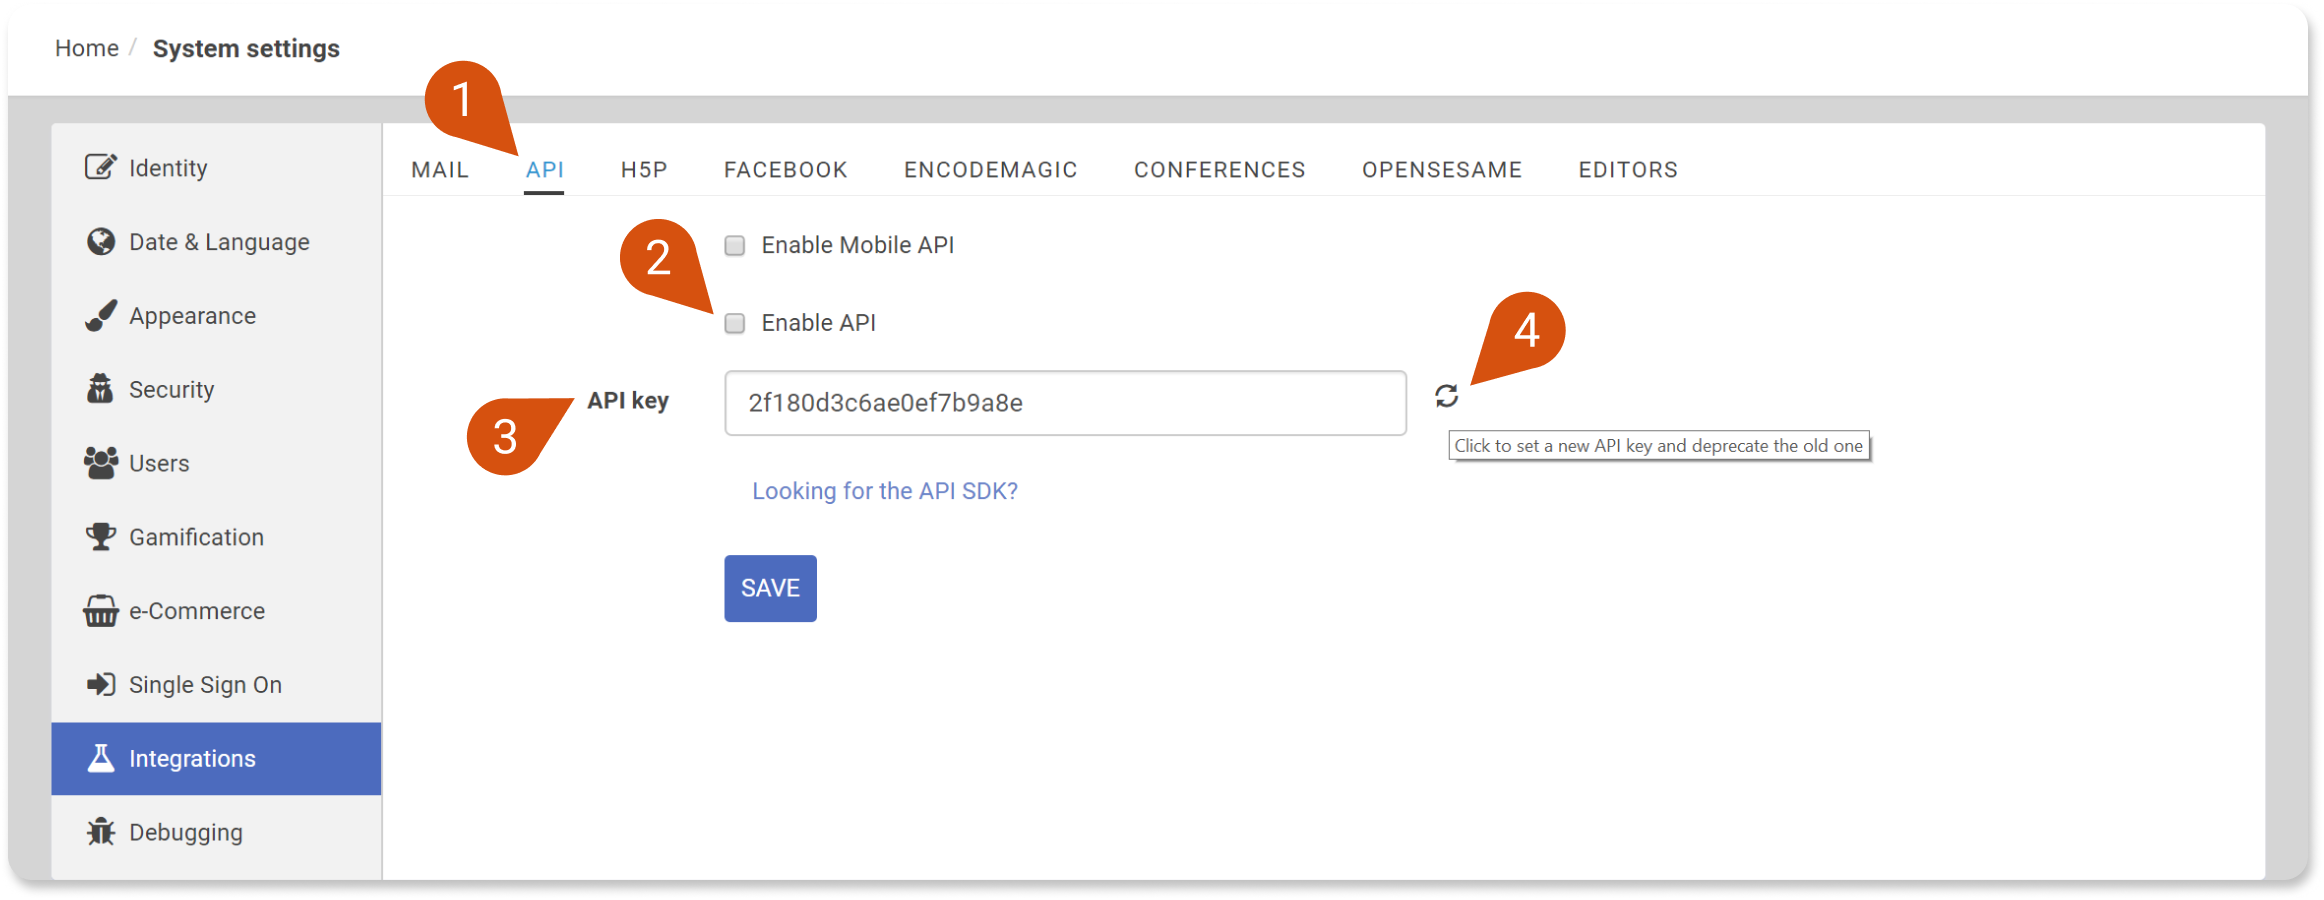
Note: You can click on the refresh icon (4) in order to set up a new API key and deprecate the old one.
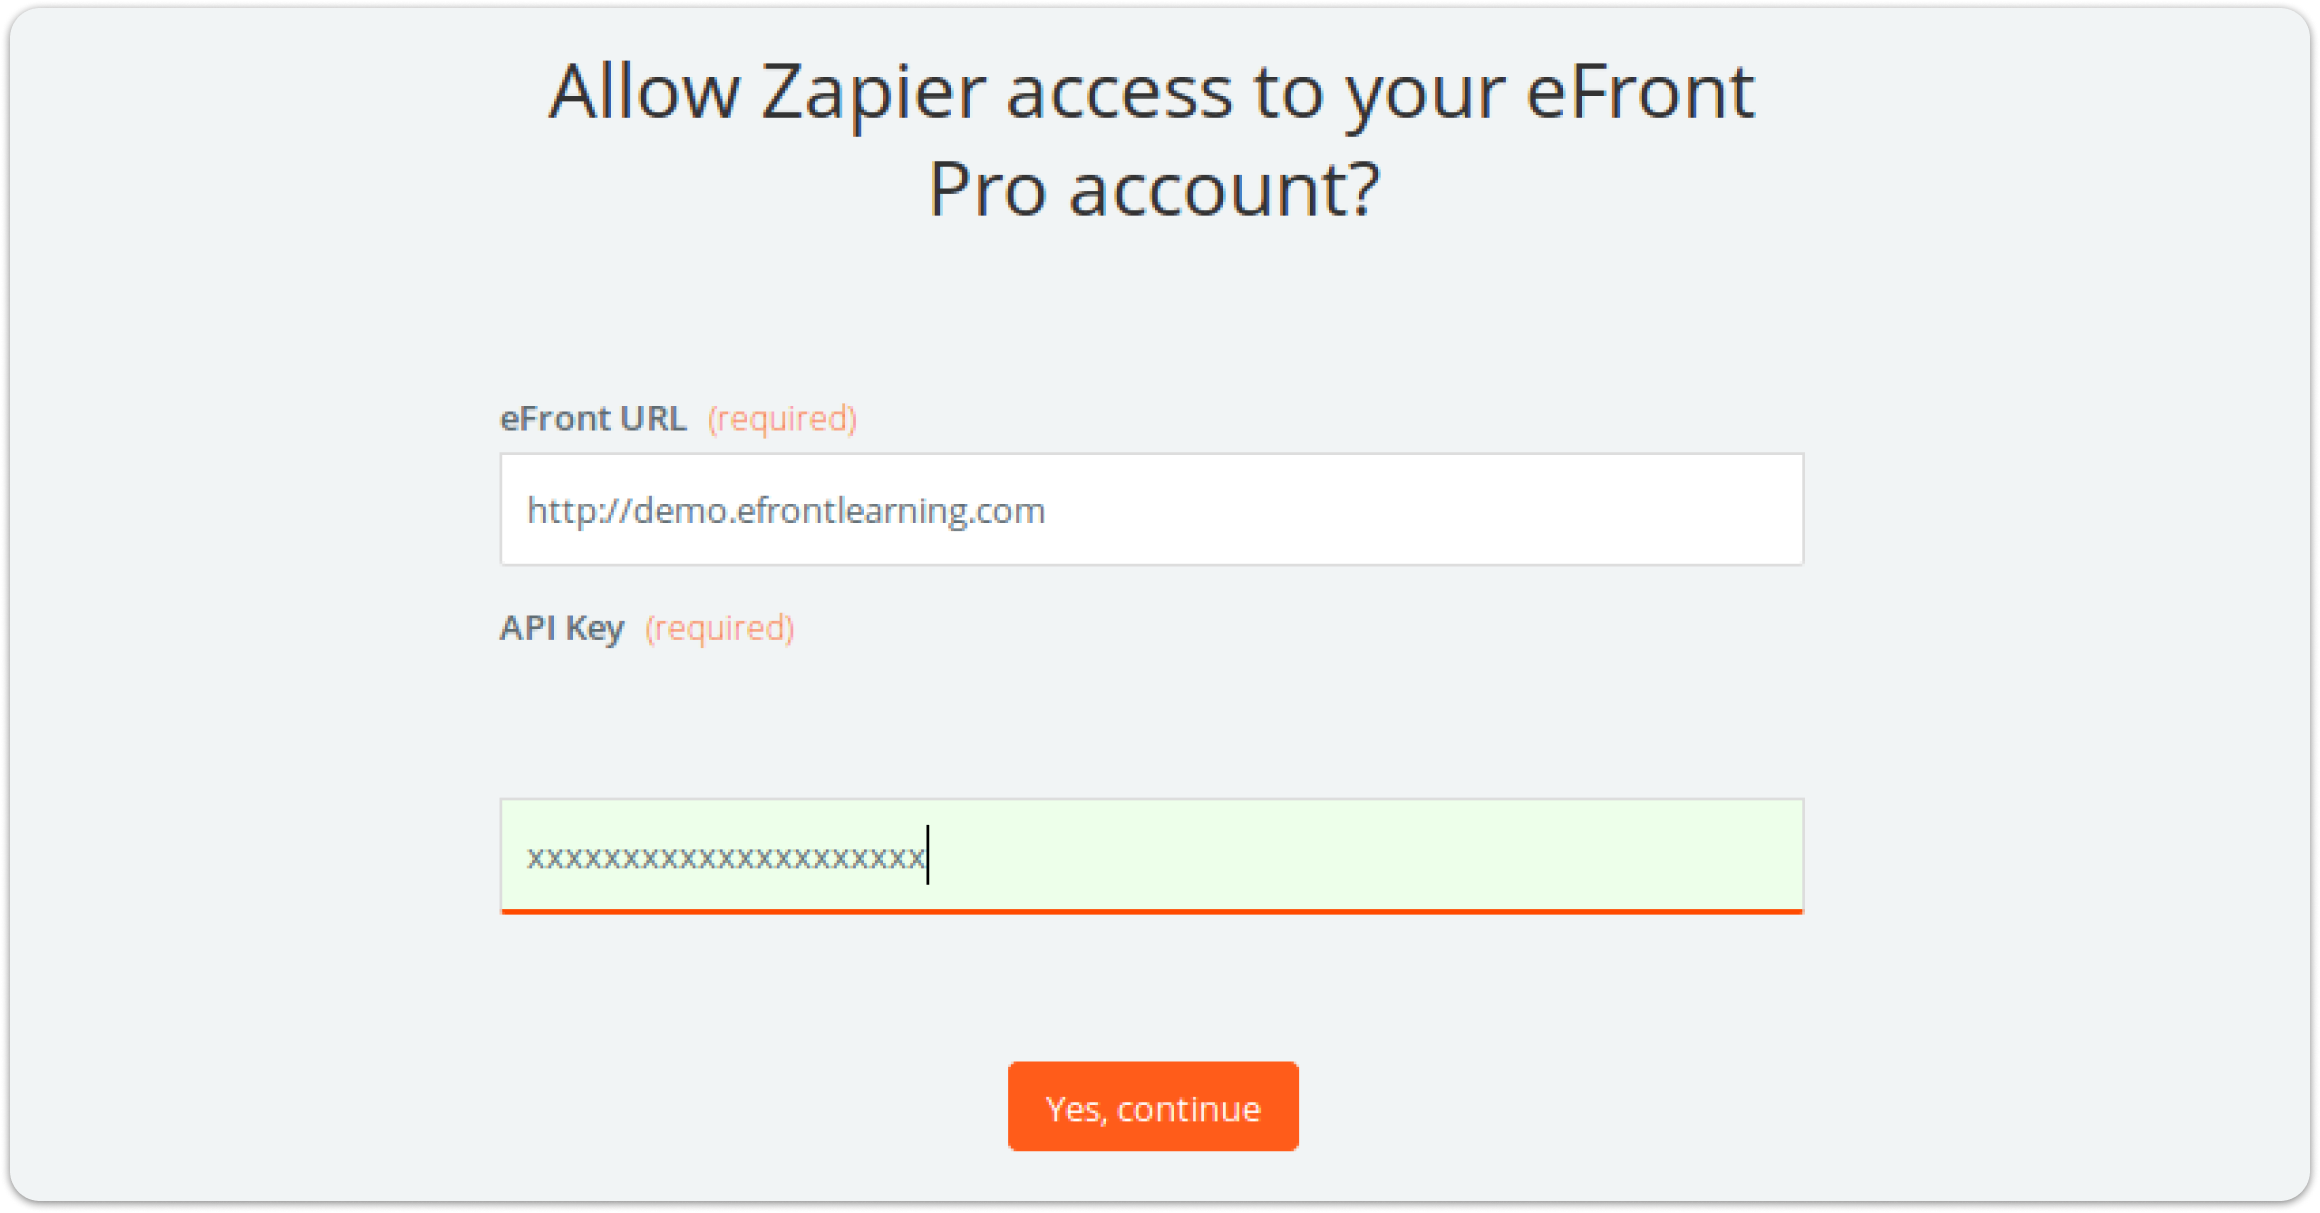
Next step is actually connecting your account. Go to Zapier's connected account page and among the list of services for a new account to connect select eFront. A pop-up window will appear, much like in the following screenshot.
 A working example
For demonstration purposes, we are going to use eFront Zapier service along with the corresponding service of MailChimp. For even more options you can explore all services provided by Zapier.
Let us create a Zap that will get new subscribers from MailChimp lists and will sign them up in your eFront system as new users. Go to your Zapier dashboard and click to create a new Zap.

First, you need to setup your trigger, which actually the point where you are getting your data from.
In this case, we are using MailChimp.. so go on and select MailChimp…
The next this is to actually select a MailChimp trigger… go on and select the New subscriber trigger…

Next, you need to connect your MailChimp account. Remember you can either do this from the Connected Accounts Zapier page or in this step of setting up your Zap. In this step, we assume that you have already a connected MailChimp account which is working correctly.

Now, you need to select a MailChimp list from which your Zap is going to pull new subscribers.

Once you have done so, click to test that data successfully and you are done setting up your trigger.

The next step is to select eFront for your action and more specifically the action Create User.

Next, connect your eFront account or select one from the list (if you already have done this step from the Connected Accounts Zapier page)

The following step is setting up the template for your Zap. Match up each field coming from your MailChimp trigger to the corresponding action field in the eFront action…

Once you are done your template should look like this

Go on and test your Zap

That's it… Now a new user is created in your eFront system… Let this Zap go live and from now on every time a new subscriber is registered in the MailChimp list you defined, in the beginning, is going to be also signed up as a new user in your eFront system.