Single sign-on is an authentication process that allows for the same pair of credentials (i.e., username - password) to be used across multiple systems. Single Sign-on can also be used for allowing users to sign in to a network of "connected" systems through a single log-in.
eFront provides many options for implementing both scenarios:
- By using SAML 2.0
- By using LDAP (or Active Directory)
- By using the REST API
- By using a cookie
- By using a plugin
| Note: In case you are setting up SAML only for a specific branch, then this branch needs to have its own branch URL (see also this article). If instead, you want branches to inherit the main branch SAML settings, this happens by default. In this last case, and if the branches have their own sub-domain, then make sure each branch URL is included in the URLs allowed by your SAML provider. |
A. SAML 2.0
eFront supports Single Sign-On (SSO), a process that allows users to authenticate themselves against an external Identity Provider (IdP) rather than obtaining and using a separate username and password handled by eFront.
To let you provide single-sign-on (SSO) services for your domain, eFront works as a Service Provider (SP) through the SAML (Secure Assertion Markup Language) standard.
What you need is a SAML Identity Provider (IdP) to handle the sign-in process and provide your users' authentication credentials to eFront. When eFront users authenticate themselves through your SAML IdP, their account details are handled by the IdP. Any changes made to those details (i.e., first name, last name, email) are synced back to eFront.
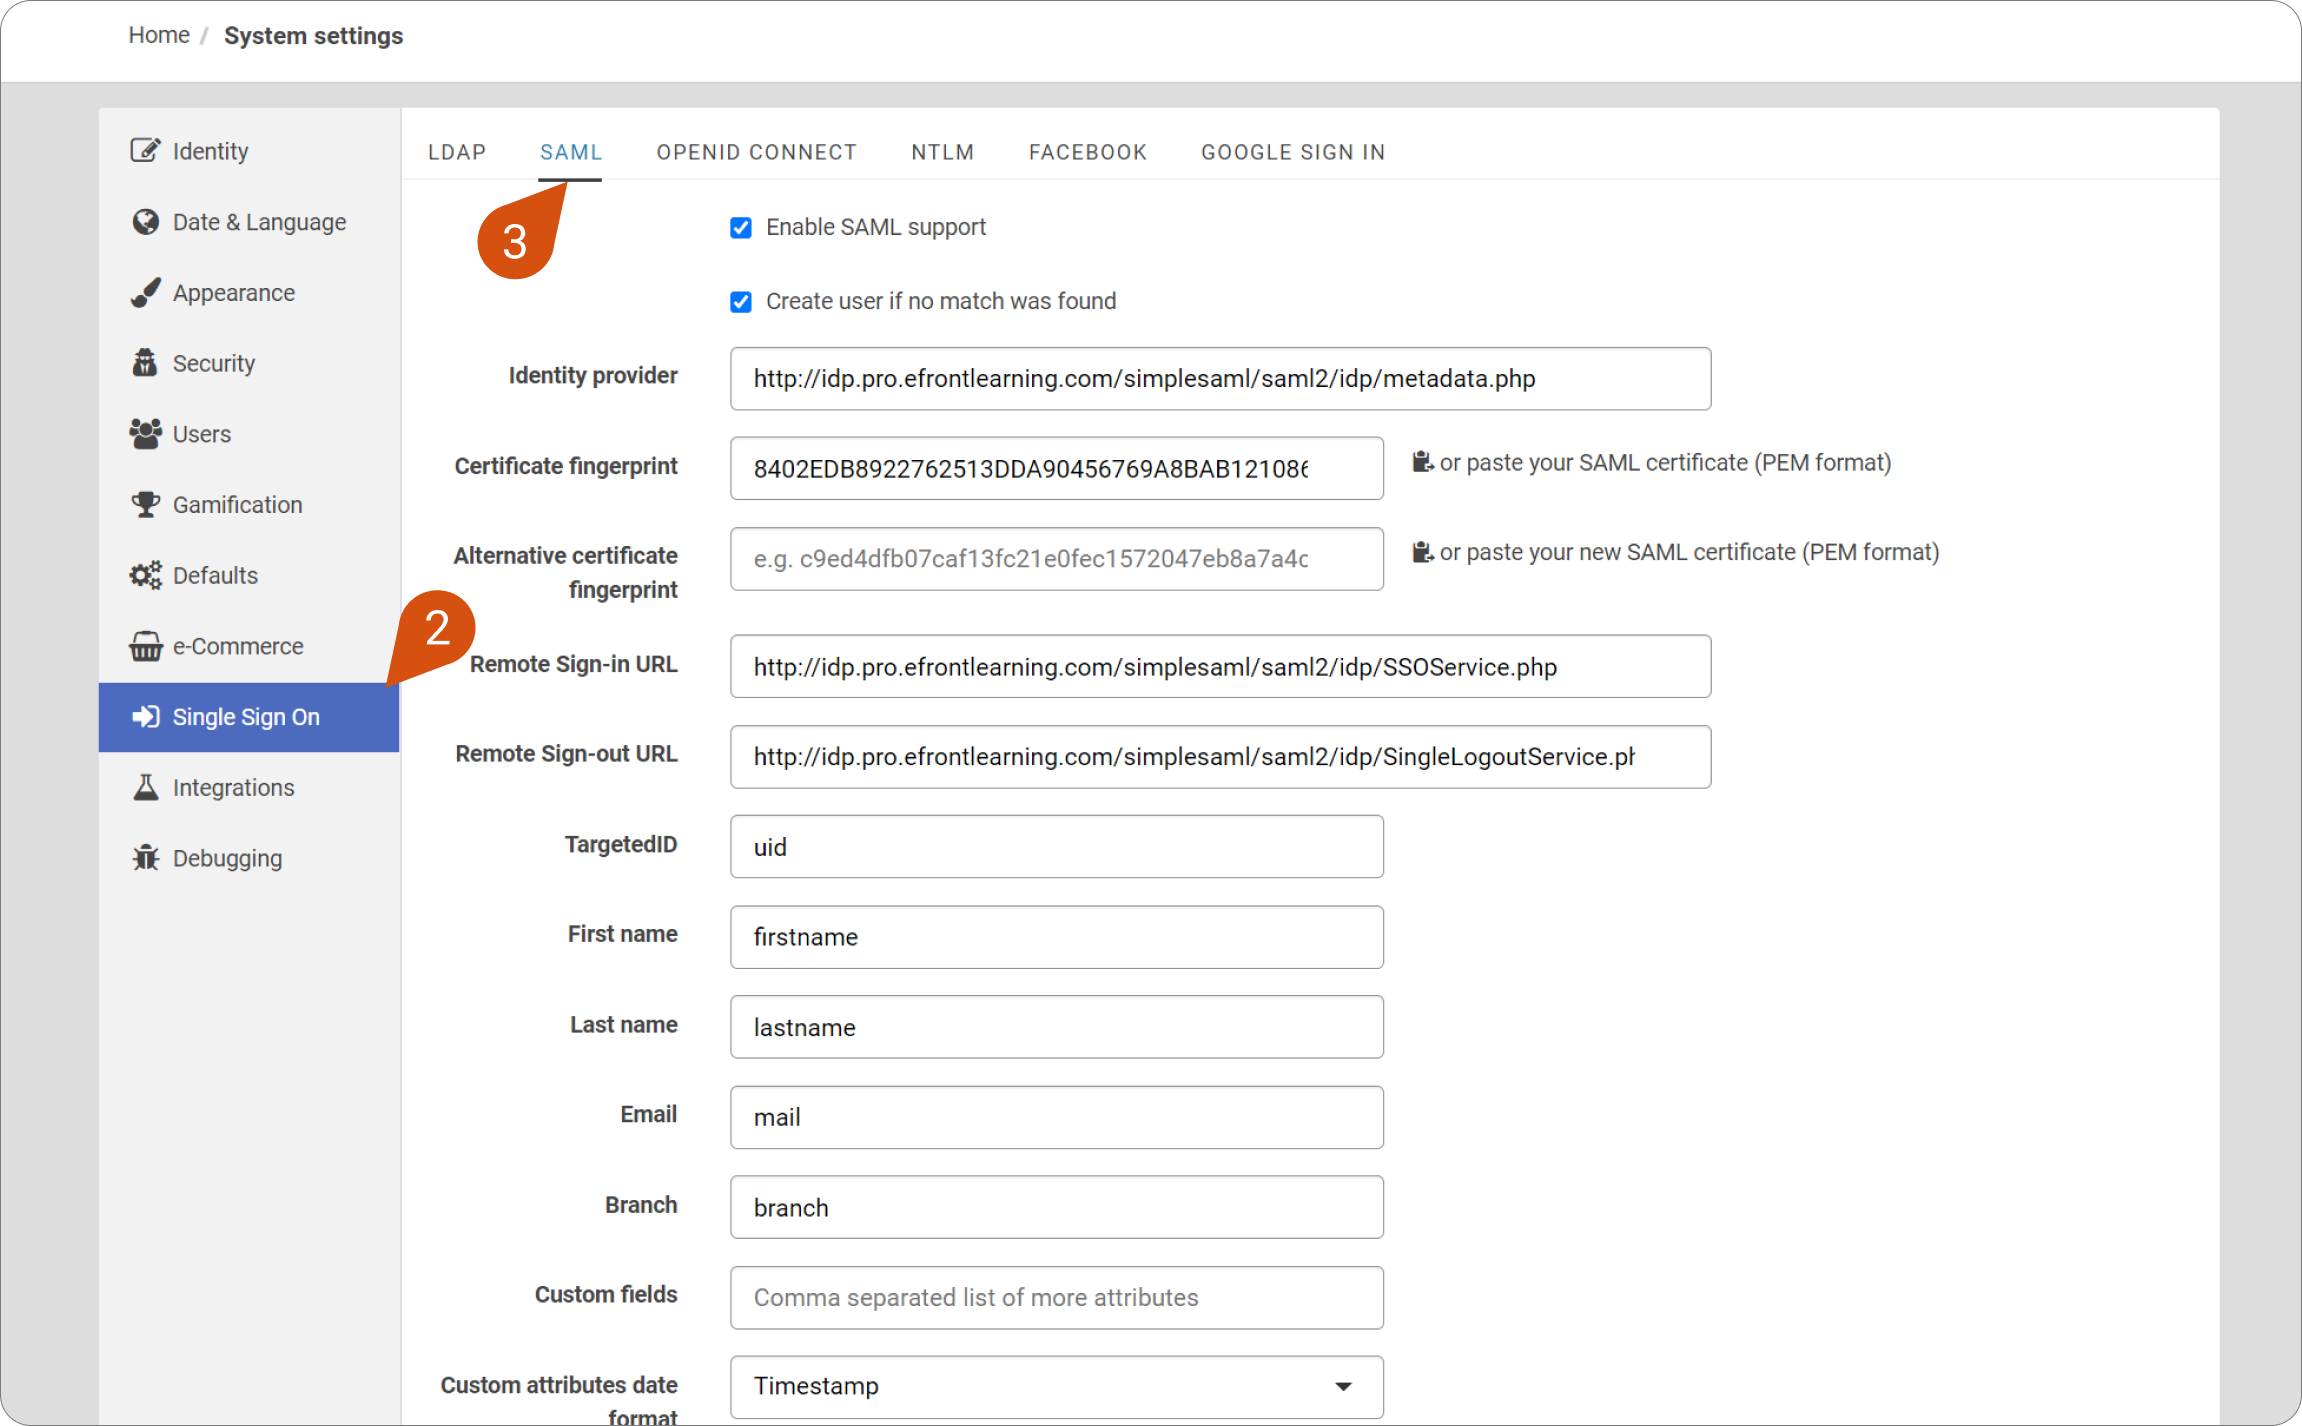
To set up SAML SSO on your eFront domain, go to the SAML tab in the System Settings (1) > Single Sign On (2) > SAML (3) page and fill in the following values:
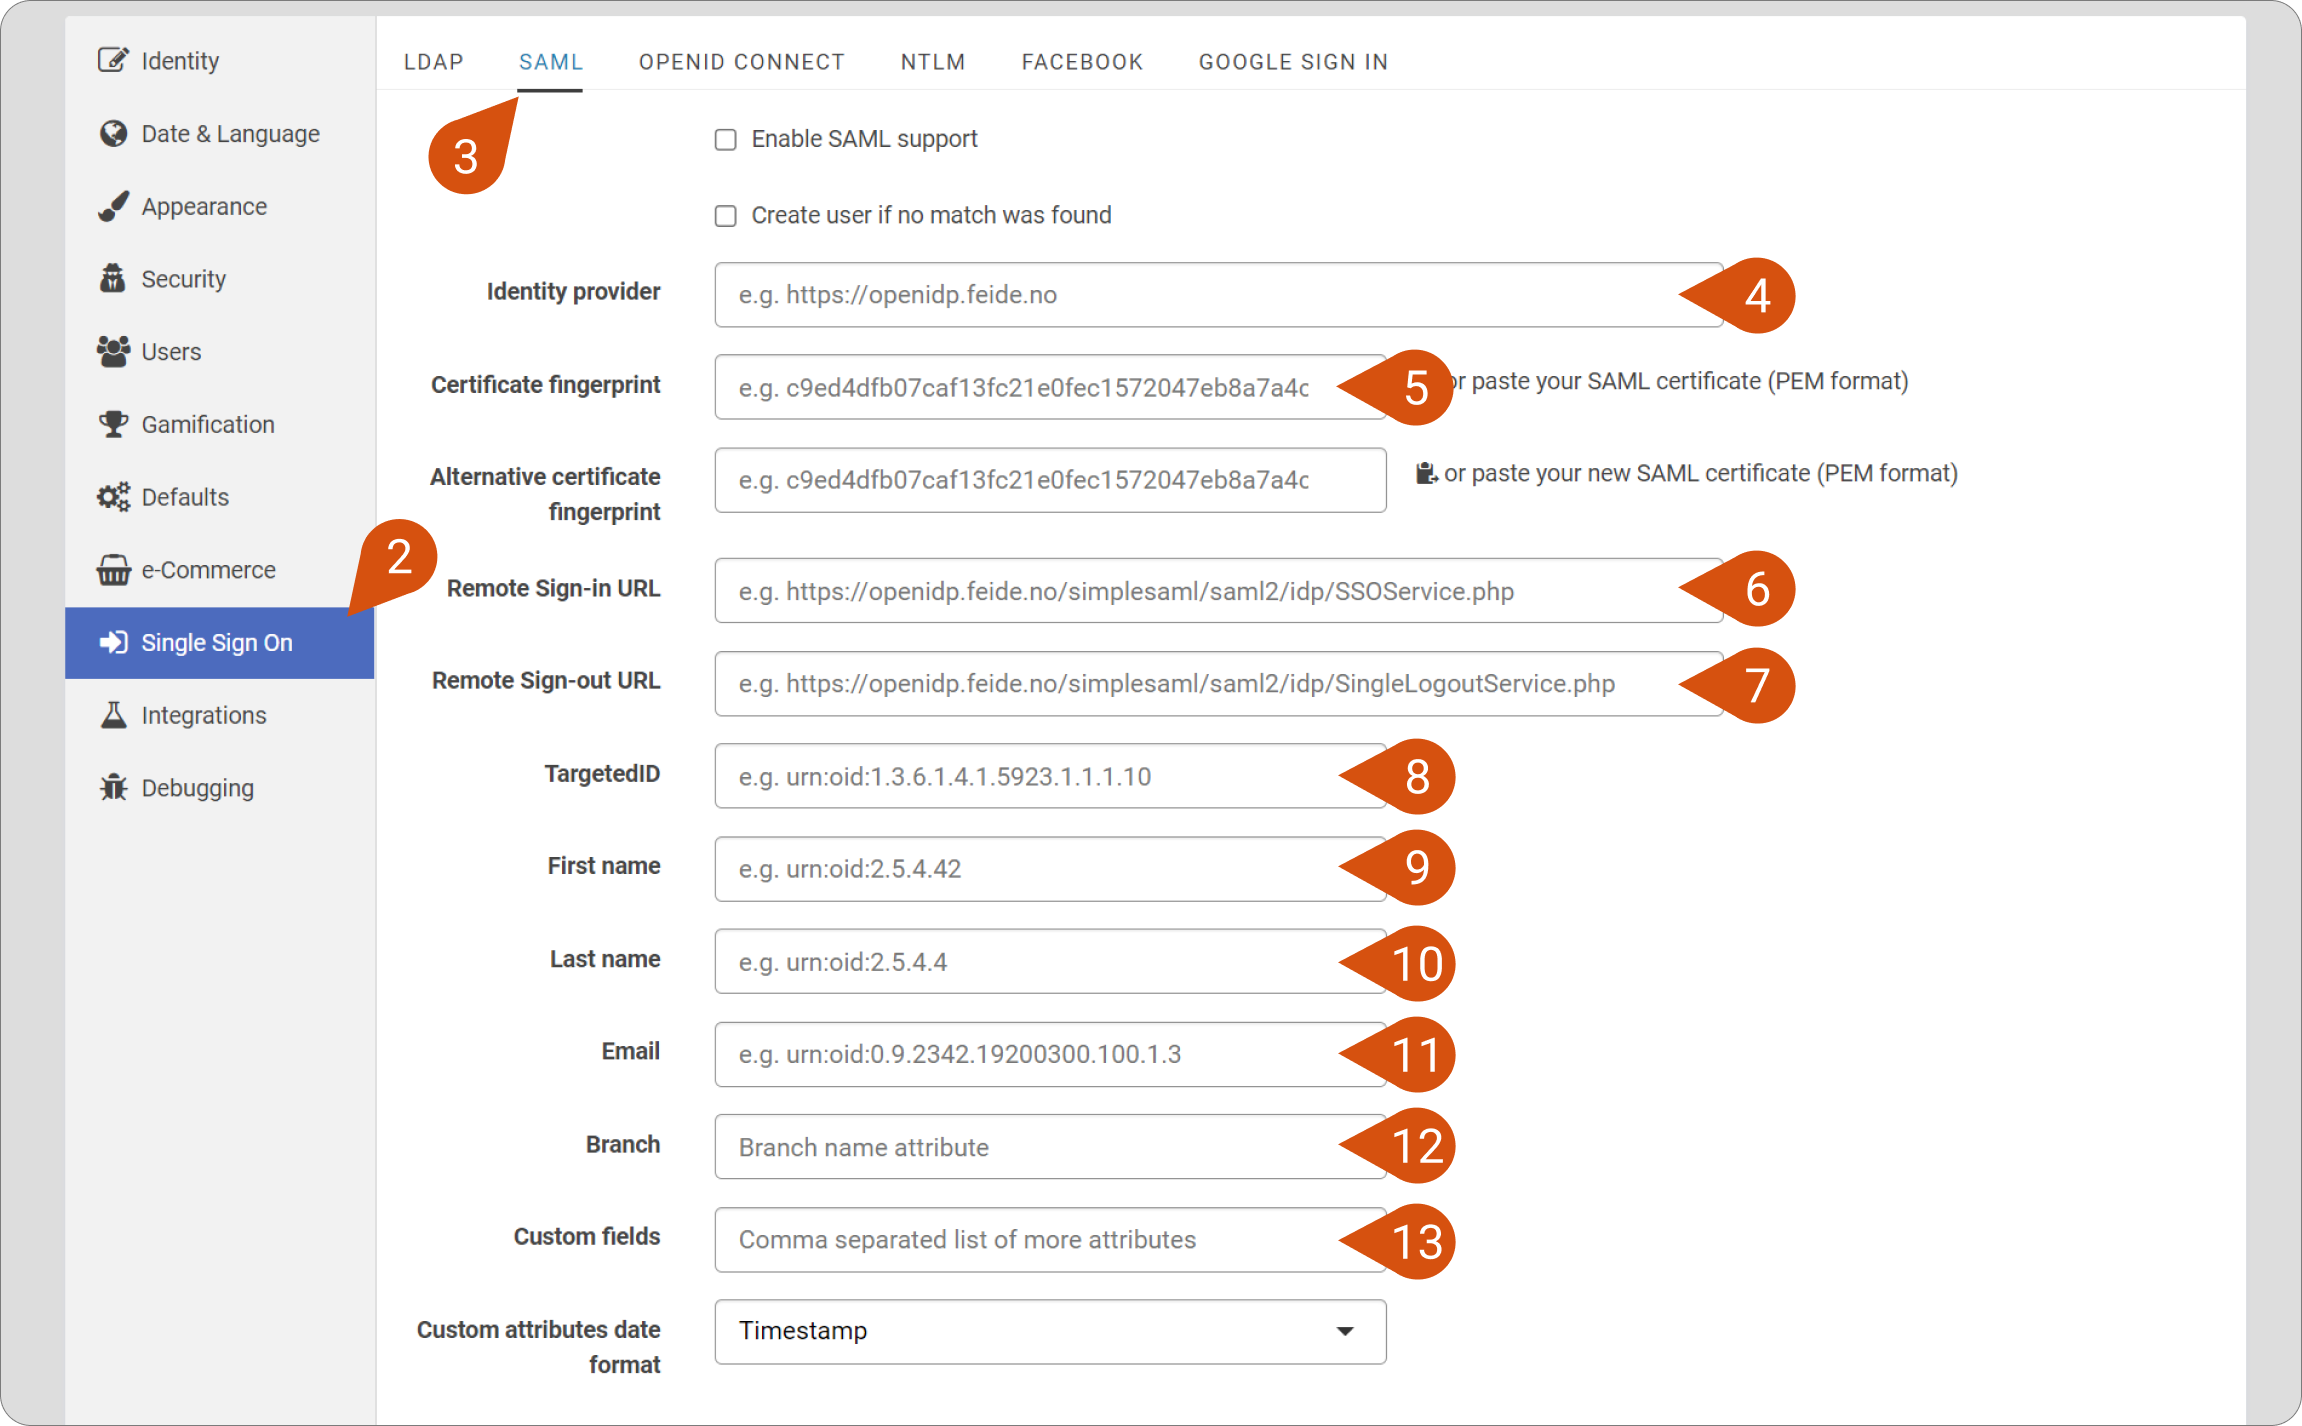
- Identity provider (IdP) (4): Your Identity Provider's (IdP) URL.
- Certificate fingerprint (5): The SHA-1 SAML certificate fingerprint provided by your IdP.
- Remote sign-in URL (6): The remote sign-in URL of your IdP where eFront redirects users to sign in.
- Remote sign-out URL (7): The remote sign-out URL of your IdP where eFront redirects users to sign out.
- TargetedID (8): The variable that holds the user's username (log-in).
- First name (9): The variable that holds the user's first name.
- Last name (10): The variable that holds the user's last name.
- Email (11): The variable that holds the user's email.
- Branch (12): The variable that holds the user’s Branch.
If you want to sync any additional info from SAML to eFront (e.g., department, hire date), you can use the Custom fields (13) option in the eFront SAML setup page:
- First, go to Home > Extend profile and create new columns for Users (for a step-by-step guide, see this article).
- For each new column, type the corresponding SAML variable in the Name field.
- Finally, go to the SAML settings page, and type the column names as a comma-separated list in the Custom fields field.
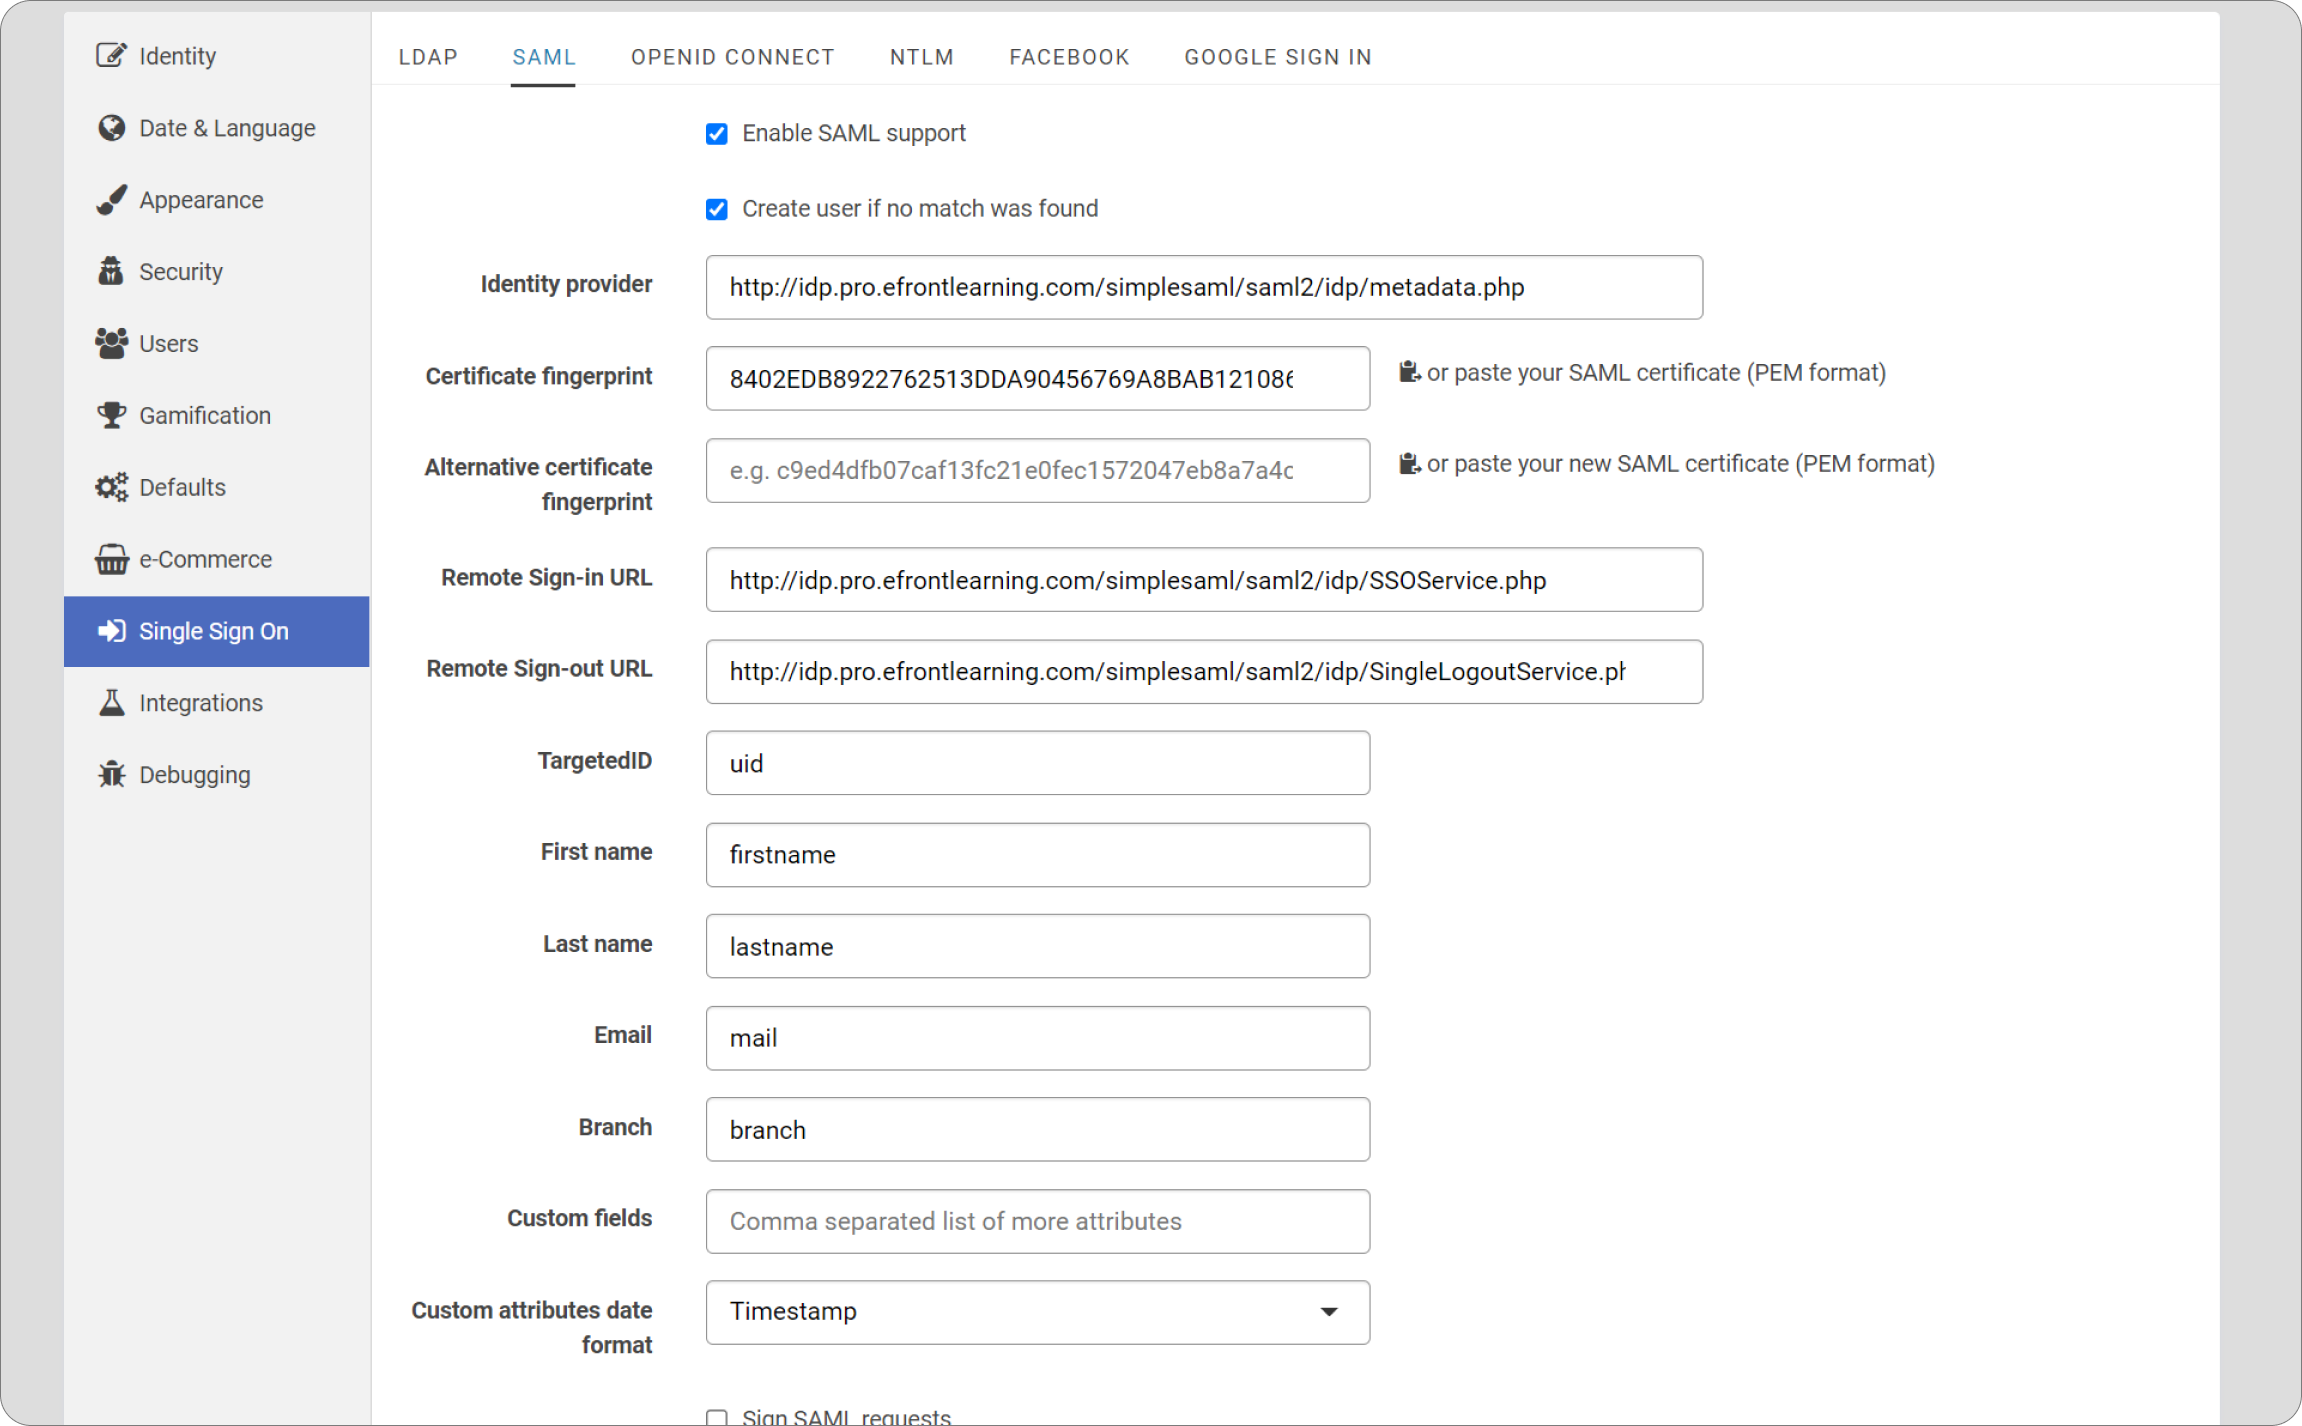
The image below illustrates an example of a SAML setup where simplesaml is used as an IdP server.
We have guides available on how to configure SAML in eFront with Azure AD, Okta, and Auth0.
B. SAML 2.0 with ADFS 3.0 (Windows server 2012 R2) as IdP
| Note: If you are using earlier versions of ADFS (i.e., 2.0 or 2.1), the process is nearly identical. |
In the following example, we assume that our ADFS IdP uses the domain name “adfs2.efrontlearning.com” and our eFront installation uses the domain name “saml.pro.efrontlearning.com”.
Step 1: Configure ADFS 3.0
-
Click to Start the Server Manager. From the tools option, choose AD FS Management to launch the AD FS management console.
-
Right-click Service and, from the context menu, click Edit Federation Service Properties…
-
The General tab contains the Federation Service Identifier which is necessary for the SSO setup. In our example, it's http://adfs2.efrontlearning.com/adfs/services/trust.
-
eFront requires a PEM format certificate, so you have to convert your certificate from DER to PEM format. To do that, you can use any available tool or an online application like sslshopper.
| Note: eFront works with RSA certificates. DSA certificates are not supported. |
Step 2: ADFS 3.0 Relying Party Trust Configuration
Now you have to define the eFront endpoints in your ADFS, either manually or by importing the metadata XML provided by eFront. We recommend using the XML file because it's easier.
To get the metadata XML file, sign in to eFront and go to the SAML tab on the Home > System settings > Single Sign On page. In the SP Metadata XML section, there's a URL that looks like this: http://saml.pro.efrontlearning.com/saml/module.php/saml/sp/metadata.php/efront-sp. Copy the URL and paste it into your browser to download the "eFront-sp" file that contains the following XML code:
<?xml version="1.0"?>
<md:EntityDescriptor xmlns:md="urn:oasis:names:tc:SAML:2.0:metadata" entityID="saml.pro.efrontlearning.com">
  <md:SPSSODescriptor protocolSupportEnumeration="urn:oasis:names:tc:SAML:1.1:protocol urn:oasis:names:tc:SAML:2.0:protocol">
    <md:SingleLogoutService Binding="urn:oasis:names:tc:SAML:2.0:bindings:HTTP-Redirect" Location="http://saml.pro.efrontlearning.com/saml/module.php/saml/sp/saml2-logout.php/efront-sp"/>
    <md:SingleLogoutService Binding="urn:oasis:names:tc:SAML:2.0:bindings:SOAP" Location="http://saml.pro.efrontlearning.com/saml/module.php/saml/sp/saml2-logout.php/efront-sp"/>
    <md:AssertionConsumerService Binding="urn:oasis:names:tc:SAML:2.0:bindings:HTTP-POST" Location="http://saml.pro.efrontlearning.com/saml/module.php/saml/sp/saml2-acs.php/efront-sp" index="0"/>
    <md:AssertionConsumerService Binding="urn:oasis:names:tc:SAML:1.0:profiles:browser-post" Location="http://saml.pro.efrontlearning.com/saml/module.php/saml/sp/saml1-acs.php/efront-sp" index="1"/>
    <md:AssertionConsumerService Binding="urn:oasis:names:tc:SAML:2.0:bindings:HTTP-Artifact" Location="http://saml.pro.efrontlearning.com/saml/module.php/saml/sp/saml2-acs.php/efront-sp" index="2"/>
    <md:AssertionConsumerService Binding="urn:oasis:names:tc:SAML:1.0:profiles:artifact-01" Location="http://saml.pro.efrontlearning.com/saml/module.php/saml/sp/saml1-acs.php/efront-sp/artifact" index="3"/>
  </md:SPSSODescriptor>
  <md:ContactPerson contactType="technical">
    <md:GivenName>Periklis</md:GivenName>
    <md:SurName>Venakis</md:SurName>
    <md:EmailAddress>venakis@gmail.com</md:EmailAddress>
  </md:ContactPerson>
</md:EntityDescriptor>
Then, return to the AD FS management console, right-click Trust Relationships > Relying Party Trusts and, from the context menu, choose Add Relying Party Trust…
C. SAML 2.0 with OneLogin as IdP
OneLogin is a service that provides single sign-on and identity management applications. You can use OneLogin as the IdP server in your SAML 2.0 setup.
Sign in to your OneLogin account and go to Apps > Find Applications. In the search field, type SAML Test Connector (IdP w/attr) and press Enter. From the search results, select SAML Test Connector (IdP w/attr) and click Add.
Go to the SSO tab (1) to get the necessary values for your integration with eFront. To get the Certificate fingerprint, click View Details (2).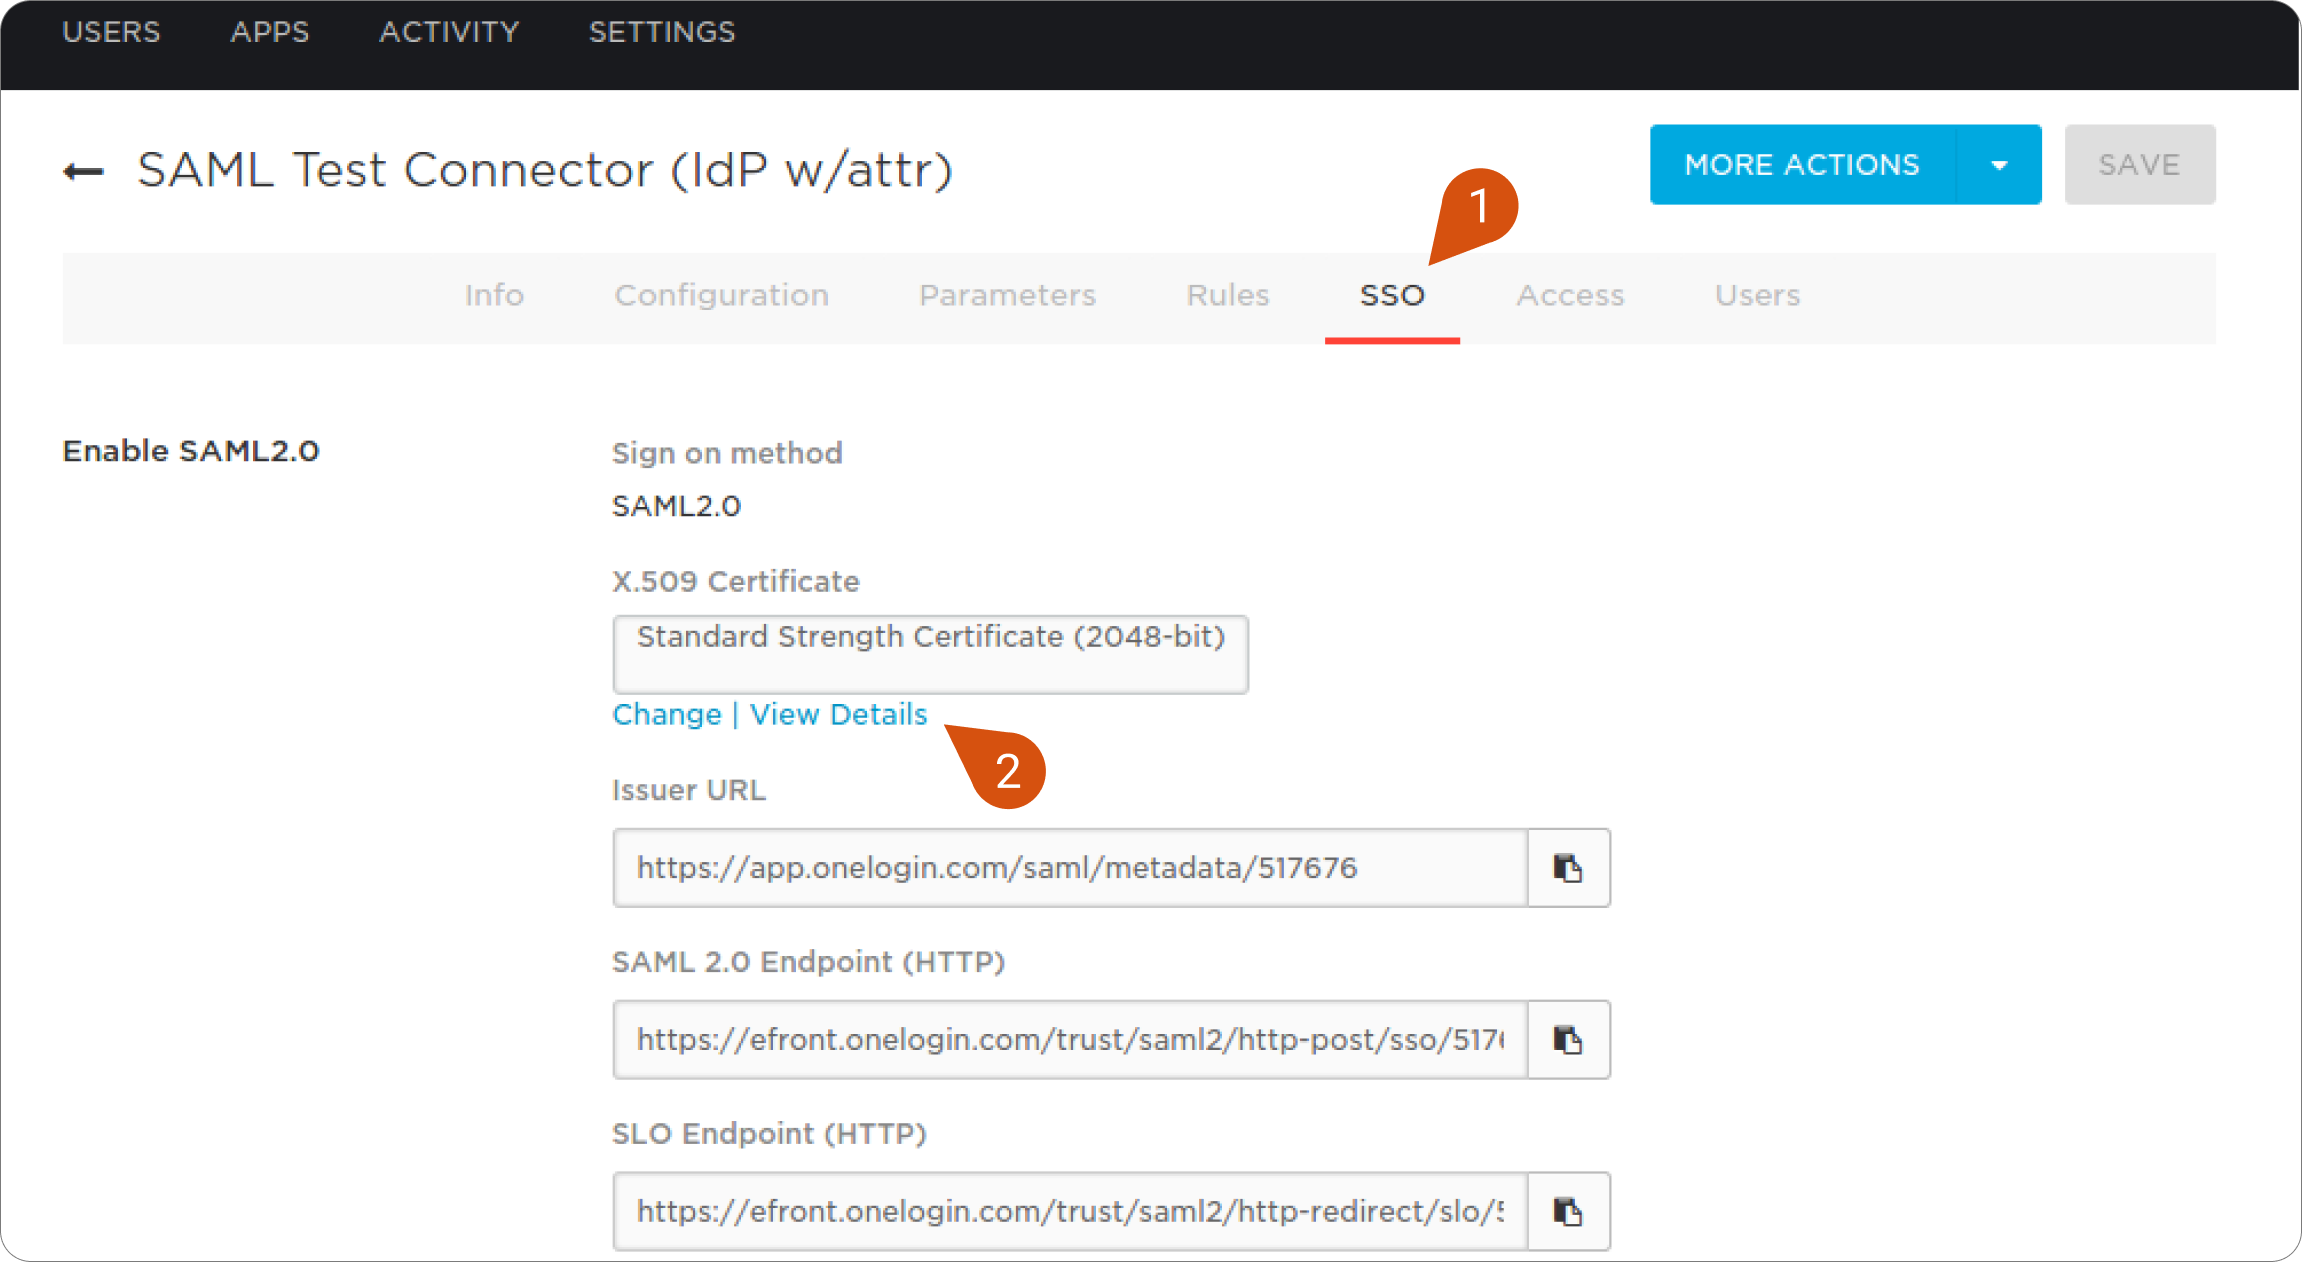
Go to the Configuration tab and, assuming that your valid eFront URL is "pro.localhost", fill in the following values:
- Audience: pro.localhost
- Recipient: https://pro.localhost/saml/module.php/saml/sp/saml2-acs.php/efront-sp
- ACS (Consumer) URL Validator: ^https:\/\/pro\.localhost\/saml\/module\.php\/saml\/sp\/saml2-acs.php\/efront-sp$
- ACS (Consumer) URL: https://pro.localhost/saml/module.php/saml/sp/saml2-acs.php/efront-sp
After configuring your OneLogin account, sign in to eFront, go to the SAML tab in the System settings (1) > Single Sign On (2) > SAML (3) page and configure your IdP settings exactly as illustrated.
After your SAML setup is complete, a link to Sign in with Saml must appear on your eFront index page.
| Note: If most of your users log in via SAML, you can check Bypass the default sign in screen and send users directly to the IDP's SAML signin page to redirect users from the eFront log-in page to the SAML log-in page. Users can still access the eFront log-in page at http://[your efront domain]/start/op/login. |
| Note 2: eFront allows you to configure a different SAML SSO setup for each branch. To do that, go to a branch page from Home > Branches, click Settings and, from the drop-down list, choose SAML. After you finish the SSO setup, branch members can log in through the branch SAML IdP instead of the branch log-in URL. |
D. AD synchronization via ADFS with LDAP API or SAML
| Note: In any case, eFront does not initiate a full-scale synchronization of data. Instead, it pulls information from each user that tries to sign in for the first time and limits this information to the absolutely necessary fields. Also, know that eFront does not store user passwords, but performs authentication against the AD itself (in the case of SAML, it doesn’t even transmit credentials). |
In the case of SAML 2.0, instead, the data set is limited by the protocol, as SAML is used to perform the authentication and grant access to eFront.
E. LDAP
F. NTLM-like
G. REST API
GET /Autologin/:loginName
The above API call returns a URL that can be used on a single instance to sign a user in without a username and password.
| Note: A complete guide to using the eFront REST API can be found here. |
H. Cookie-based
I. Plugin-based
If signing in a user automatically requires some process not covered by the system, the required functionality can be implemented with a custom plugin that calls the User::login function to do the sign-in.
| Note: A comprehensive guide to creating custom plugins can be found here. |